
DIY Specialist - Lené Pieters
- DEA
- May 11, 2020
- 6 min read

Updated: Jan 28, 2021
Written by Lené Pieters
’Talk - Talk’ - A Mixed Media DIY by Lené Pieters
This DIY is inspired by an antique postcard from my collection. The theme here is of communication (inspired by the postcard), which is important especially now, during the time of lock-downs and the pandemic. The following step-by-step breakdown of my process revolves around creating your own communication strategies with the objects you find around the house.
I do give some options, so that you can learn from my techniques. You do not have to copy this exactly, so give it your own twist. The artistic challenge lies in finding creative yet practical ways to combine all your diverse items into a cohesive narrative on one canvas.
Tip: There are no rules here, so make art to please yourself!
Let’s get started…

Image courtesy - Lené Pieters
1. Gather all fabrics - from old clothing, curtains, upholstery, off-cuts, etc.
This is a good way to use sentimental fabrics from special clothes, to make memorials of loved ones or to remember events of the various souvenirs one usually collects on their travels.
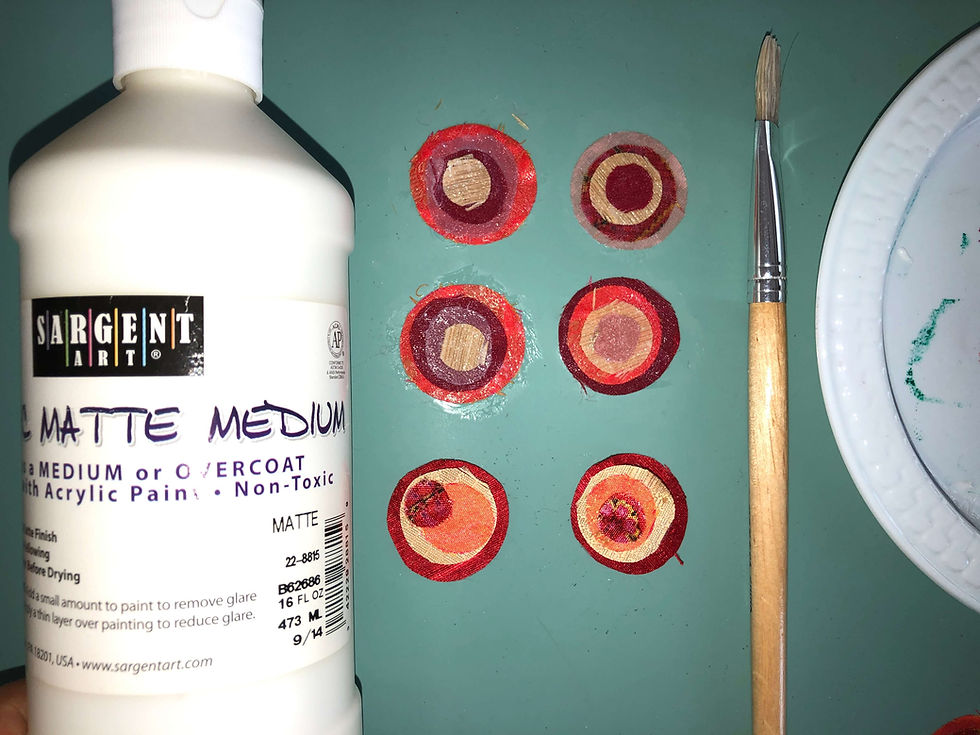
Image courtesy - Lené Pieters
2. Cut the fabrics in a shape of your choosing and layer them
I used my Accuquilt Go die-cutting machine to cut 4 different sizes of circles. If you do not have access to a die-cutting machine, you can trace any circular object in your house onto the fabrics and cut them out by hand. I am using circles, because I find them fun and the different colors look fabulous when layered together. But you can pick any shape you like!
Stiffen your fabrics by painting them with thick layers of medium or glue. This prevents them from fraying so they can last a long time on the canvas. After drying, peel them off and cut away any protruding slivers of medium.
Tip: Work on a non-stick surface like a silicone sheet.
Image courtesy - Lené Pieters
3. Gather objects that you would like to include
These can be any objects you find around the house - like yarns, sequins, decorative papers, old photographs, postcards, etc. Other historical bits of ephemera like laces, trims, silk flowers will work well too.
4. Choose a focal point and surrounding objects
For example, if you use a photograph or antique postcard as a focal point; select objects with colors that already appear on your focal point object.
I am using an antique postcard which is already mounted on thick card. The hand-tinting of the postcard suggests pinks, oranges and some muted tones of blue. Orange and blue are opposites on the color wheel and make a perfect match. Use different tints and shades to add interest.

Image courtesy - Lené Pieters
5. Create your base on a canvas
Taking your base canvas as a guide, start laying out your materials and experiment with positions, especially for the background elements.
I have chosen tissue paper, a sheer rose fabric and an orange woven paper. They work well together when layered.
If you choose to use tissue, you can glue it on a canvas with any kind of glue. If using PVA, use 1:1 ratio of water so it doesn't become hard later. I am using Acrylic Matte Medium, which retains some flexibility after drying.
Paint the glue on the canvas with a brush. Lay the tissue paper gently on top and press down with your fingers. Do not panic if it rips in places. If parts are sticking up, put more medium on the paintbrush and dab down to force the tissue paper into the canvas.
Leave to dry until the paper feels firm.
Tip: An asymmetrical (diagonal) composition gives the piece some energy.

Image courtesy - Lené Pieters
6. Create a pattern with a stencil
If you have a stencil lying around, you can layer it on top of your base and use a sponge to dab paint all over the stencil. Remember to rinse the plate, stencil and sponge with soapy water immediately afterwards.
Leave the canvas to dry.

Image courtesy - Lené Pieters
7. Prepare your fabric elements for the base (do not glue yet)
I added the orange woven paper to the left half of the canvas by cutting a rough triangle. Use a ruler or do it free-hand like me. Above that is my sheer rose fabric. As you can see, I love creating layers!

Image courtesy - Lené Pieters
8. Free-style machine stitch
I have selected various cotton threads that echo the colors of the entire piece and I am now ready to start the stitching element. I didn't follow any pattern in particular; just used free-motion stitching all over the different sections.
This merging of fabric and paper could also be hand-stitched using decorative embroidery stitches. It all depends on what you feel will work best with your composition.
9. Glue stitched fabrics on canvas/base
Carefully turn the piece upside-down onto a non-stick surface. Apply a layer of glue on the edges of the fabric. Then place the canvas upside-down on the stitched fabric. Place some heavy books inside the hollow part of the canvas frame and leave overnight to dry properly. This will prevent the canvas from losing its shape and allow it to retain its surface tension.

Image courtesy - Lené Pieters
10. Let's work on the focal point piece
I created frame for the postcard using a stencil (as shown above), but you can choose to do any shape you like. Keep it a clean rectangle, or get funky, make it you.
Then gather different items that might work with your paper frame. Mine has deep pointed sections that are perfect places to add some small embellishments.

Image courtesy - Lené Pieters
11. Check your composition
I layered and stitched some artificial flower petals on top of the fabric base. I did a single loop stitch to adhere each flower to the canvas. Poke the needle from the back, through the flower; then pick up a sequin. Thread a single seed bead onto the needle, then push the needle back through the sequin, flower and the canvas, to the back. This anchors everything down and you don’t have to poke the needle through too many times.
After stitching, remember to paint medium or white glue on the back of the canvas wherever the threads are knotted; to preserve them.
Tip: When stitching through thick canvas, wear appropriate safety equipment and do not use too much force on a needle. Use a pair of small pliers, grip the needle and gently keep pushing through the canvas. Do not push against your finger, as this is a major safety hazard!

Image courtesy - Lené Pieters
12. Finishing touches
Time to glue down the heavy elements. I prefer thick double-sided tape for this part.
The most effective placement for tape is to put a tiny piece on each corner, then fill in the blank areas until there are no large empty areas.
Press down firmly on the canvas and hold the elements together. Leave to bond for a few hours before lifting the piece vertically.
Finally, your DIY piece is ready to hang and enjoy!
About Lené:
Lené Pieters is a mixed-media and book artist from South Africa and has taught various art and craft classes since 1998. Mostly self-taught, she is also a graduate of the Brooklyn Fine Arts Studio in Pretoria and she has two painting diplomas from the University of South Africa. Lené works with many mediums including oils, acrylics, fabric, paper, collage, wire, beads, rubber-stamps, construction materials and various household objects and original antique ephemera and Victorian photographs. She creates mixed media assemblage works on canvas and in altered books and has created art journals since the age of 15.
Lené also painted two public artworks in Dubai, one of which is a table-top Arabian horse maquette and another, a life-sized falcon for 'Flight of the Falcon', a public art program by ArtWorks, both with custom designed Celtic patterns. The horse maquette is in a private collection and the falcon is touring around Dubai in a public exhibition.
Her quilted metal applique work on 3 canvases, entitled 'Sew Applique'-Bull', was selected for the final round of the Red Bull Art of the Can Competition in Dubai in 2008.
Lené is currently collaborating with author Dedra L Stevenson on illustrating a series of Children's Books called The Magic Carpet Series. Feel free to explore that work in progress on the Facebook page of the same name.
Wow! We know that will keep you busy for a while as you stay home! Which steps did you like the most? And which ones are you going to recreate first?

Show Lené some love here:
Web: LenePieters.com
Insta: @moonberry_studios
Image courtesy - Lené Pieters
Want to be featured? Click here for more information
Join our Creative Textile Community!


Comments